A few years ago I had a pothos on a bookshelf that I watered every Sunday without thinking much about it. When it started drooping mid-week, I assumed it needed more water and added a second watering day. Within a few weeks, the lower leaves were yellowing and the stems felt soft near the base. The problem was not thirst — the roots were sitting in wet soil with very little oxygen. Once I stopped following a fixed schedule and started checking the soil first, the plant slowly recovered.
That’s the core problem with watering houseplants: it looks simple, but the most common mistake isn’t forgetting — it’s watering too often and too automatically. This guide gives you a practical, check-based system for real homes with mixed light, different pot sizes, and busy schedules. You’ll learn how to read your soil, when pot weight tells you more than any meter, and which common “helpful” habits are actually making things worse.
Quick Answer: The best way to water houseplants is to check the soil before you water, rather than using a strict schedule. Push your finger an inch into the soil; if it is damp, wait a few days. When it is dry, pour water over the soil until it runs out the drainage hole, let it sit for ten minutes, and empty the saucer.
Best for: Beginner indoor plant owners
Time needed: 5–10 minutes per check
Main skills: Reading soil moisture, using pot weight, avoiding overwatering
Best method: Check first, water only when needed
Important: Do not water a plant only because the leaves are drooping. Dry roots and overwatered roots can both cause wilting. Always check the soil before adding more water.
Table of contents
- The 10-second watering check
- Understanding your plant’s specific needs
- Building a smart check-day routine
- Moisture meters: how to use them right
- Simple no-tech moisture tests
- Watering techniques for healthy roots
- Common watering mistakes to avoid
- Seasonal and environmental adjustments
- Final Thoughts on Houseplant Watering
- FAQs
- Sources and further reading
The 10-Second Watering Check
Small habit that helps: I like to check plants before refilling the watering can. That little pause stops automatic watering and makes it easier to notice which pots are still heavy, which ones are drying faster, and which plants simply need more time.
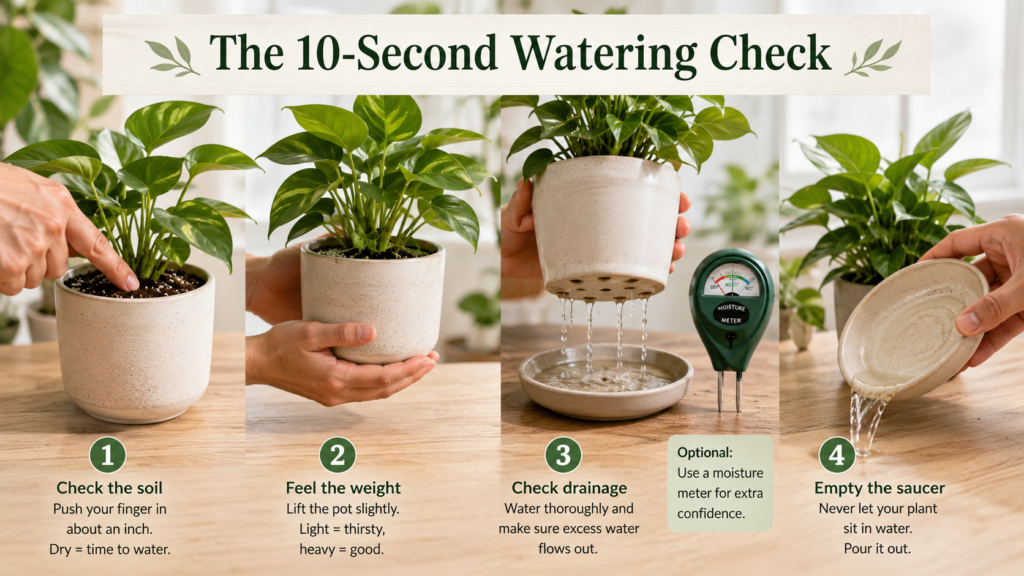
Before you reach for the watering can, do three quick checks. This takes less than a minute and will prevent the two most common mistakes: watering a plant that’s still wet, and missing a plant that genuinely needs it.
- Touch: push a finger about 2.5 cm (one inch) into the soil. If it’s still cool and damp, put the can down and come back in a day or two.
- Lift: pick up the pot. A shockingly light pot is likely dry all the way through. A heavy pot still has moisture in the lower half — and that’s where the roots are. This is one of the best no-tool checks you’ll ever use.
- Look: dry soil often turns a lighter brown or grey and may pull away from the pot’s inner edge. Wet soil looks darker and richer. Don’t rely on leaf droop alone — both overwatered and underwatered plants can look wilted for completely different reasons.
When you do water, do it properly: pour slowly until water runs out of the drainage hole, let the pot sit for ten minutes, then empty the saucer completely. Roots sitting in standing water in a saucer is one of the most overlooked causes of rot in otherwise well-cared-for plants.
Once this becomes a habit, watering schedules get much simpler. You don’t water every Saturday — you check every Saturday and only water the pots that actually need it.
Understanding Your Plant’s Watering Needs
Indoor watering isn’t just about adding water — it’s about maintaining the right balance between water and oxygen around the roots. Stay too wet for too long and roots begin to suffocate and rot. Stay too dry for too long and the plant slows down, drops leaves, and becomes vulnerable to pests. The right moisture level depends on the type of plant. A cactus, a fern, and a pothos do not want the same soil conditions, even if they are sitting on the same shelf.
How plant type affects watering
Succulents and cacti store water in their thick tissues and are adapted to long dry periods — they prefer to dry out almost completely between waterings. Ferns and moisture-lovers have thinner, more delicate tissue and need a consistently steadier level of soil moisture. Most common tropical houseplants fall somewhere in the middle.
| Plant category | When to water | Examples |
|---|---|---|
| Succulents and cacti | Soil mostly bone-dry all the way through | Aloe, jade plant, cactus |
| Most tropical foliage plants | Top 2.5 cm (1 in) dry, deeper soil slightly moist | Pothos, philodendron, monstera |
| Moisture-loving plants | Top layer just starting to dry — never let the pot dry completely | Ferns, peace lily, calathea |
If you’re unsure which group your plant belongs to, a quick search for its common name plus “watering” will usually give you the answer in under a minute. Most popular houseplants are very well documented.
Building a Smart Check-Day Routine
A good watering routine isn’t a strict calendar — it’s a regular checking habit. University of Maryland Extension explicitly advises against watering on a fixed schedule because it almost always leads to over- or under-watering, since actual drying times vary with season, light, pot size, and temperature.
What affects how fast soil dries
- Pot size: small pots dry out significantly faster than large ones, which can hold moisture for days or even weeks in a cool, dim room
- Pot material: unglazed terracotta is porous and breathes, drying out faster than sealed plastic or glazed ceramic
- Soil structure: dense, peat-heavy mixes act like sponges; chunkier, well-aerated mixes with perlite or orchid bark drain and dry much faster
- Light and temperature: a plant in a warm, bright window dries out far faster than the same plant in a cool corner
A practical check-day framework
Instead of scheduling watering days, schedule checking days — then water only what passes the finger test and feels light:
- Twice a week: small pots and plants sitting in bright, warm windows
- Once a week: medium and large pots in average indirect light
- Every 10–14 days: succulents and cacti — they often still won’t need water even then
Moisture Meters: How to Use Them Right
Moisture meters can be genuinely useful, but they’re not as reliable as most people expect out of the box. Most basic models estimate moisture by measuring electrical conductivity in the soil — which means that high levels of fertilizer salts or a particular type of potting mix can skew the reading. A pot with very salty, dry soil might still read as “moist.” Use them as a second opinion alongside the finger test and pot weight, not as your only method.
Getting accurate readings
- Insert the probe halfway to two-thirds down into the pot to measure the actual root zone, not just the dry surface layer — the top always dries first and will give you a misleadingly “dry” reading
- Take 2–3 readings in different spots around the rootball rather than relying on a single plunge in the centre
- Use it as a trend tool: learn what number your meter shows when the plant is clearly happy and healthy, then use that as your personal reference point rather than treating the “red/green” zones on the dial as universal rules
If you find your meter giving readings that don’t match what you can feel with your finger, trust your finger. Hands-on checks are still the most reliable method for most home growers.
Simple No-Tech Moisture Tests
If you don’t want gadgets, or you’re just starting out and don’t trust them yet, visual and physical cues are more than enough to build a solid routine. The key is to always confirm what you see with a soil check — leaves alone can be misleading.
What leaves can (and can’t) tell you
- Drooping leaves: peace lilies droop dramatically when dry and perk back up within an hour of watering — but heavily overwatered plants also droop, because their rotting roots can no longer move water upward. Always check the soil before deciding to water a drooping plant.
- Pale or pulling soil: dry soil often turns lighter in colour — grey or pale brown — and may pull away from the inner edge of the pot, leaving a visible gap. This is one of the clearest visual signs that it’s time to water.
- Crispy leaf edges: this usually points to dry air or inconsistent watering, not to a plant that simply needs more water right now. Check the roots before adding moisture.
Watering Techniques for Healthy Roots
The best technique is whichever one fully saturates the entire rootball and then lets it drain and breathe freely. There are two main approaches, and each has a specific use case.
Top watering
Pour water slowly over the soil surface until it runs out of the drainage hole. This is the default method for most plants. The downward flow physically pushes stale air out of the soil and draws fresh oxygen in behind it — which is exactly what roots need. It also gradually flushes excess fertilizer salts out of the mix, preventing the buildup that causes brown leaf tips over time.
Bottom watering
Set the pot in a bowl or tray of water and let the soil draw moisture upward through capillary action. This is excellent for rehydrating bone-dry soil that has become water-repellent and is letting water run straight down the edges. It’s also good for plants like African violets that prefer dry foliage. The limitation is that mineral salts accumulate near the top of the soil over time when you bottom-water exclusively — so top-water at least once a month to flush them out.
Common Watering Mistakes to Avoid
Pots without drainage holes
Drainage holes are the single most important feature of any plant pot. Without one, excess water has nowhere to go and collects at the bottom of the mix right where the roots are. If you love a decorative pot that has no holes, use it as a cachepot: keep the plant in a basic plastic nursery pot with drainage, drop it inside the decorative outer pot, and take it out to water at the sink. Empty any water that collects in the outer pot after watering.
If the plant has already been sitting in wet soil for too long, it may be safer to refresh the mix completely. This mess-free repotting guide walks through the process step by step.
Using softened water
Home ion-exchange water softeners work by replacing calcium and magnesium ions with sodium — which means softened water is high in sodium, and regular use will gradually damage houseplant roots. Use water from an unsoftened tap (often the outdoor garden tap or the kitchen cold tap on a bypass), or use filtered water or collected rainwater.
Adding a gravel layer at the bottom “for drainage”
This is one of the most widely repeated houseplant myths. Putting a layer of gravel or stones at the base of a pot doesn’t improve drainage — it creates a “perched water table,” which means the saturated zone of soil moves higher up into the pot, closer to the roots, rather than lower. Colorado State University’s horticulture blog addresses this directly. Use a uniform potting mix all the way to the bottom, and let the drainage hole do its job.
Watering on a fixed calendar
Watering every Sunday whether the plant needs it or not is probably the most common cause of overwatering. Soil drying time changes with the season, the light level, the pot material, and the plant’s growth rate. A plant that needed water every six days in July might only need water every 18 days in December. Check first, water second.
Seasonal and Environmental Adjustments
Most houseplants slow their growth significantly in winter due to lower light levels and cooler indoor temperatures. This means they use water more slowly and the soil stays wet for much longer between waterings. If you don’t adjust your checking frequency, winter is when overwatering becomes most likely — even for people who water correctly the rest of the year.
Humidity vs. soil moisture — don’t confuse them
Running central heating in winter dries out the air in your home, which often causes crispy brown leaf edges and tips — especially on humidity-sensitive plants like calatheas, ferns, and peace lilies. This is a humidity problem, not a watering problem. The fix is a humidifier near the plant, or grouping plants together to create a locally more humid microclimate. Adding more water to the soil won’t help the leaves and may harm the roots, since winter soil already dries slowly due to low light. Keep those two things separate in your mind: what the air needs and what the roots need are often completely different.
Final Thoughts on Houseplant Watering
Good watering habits come down to one shift in thinking: stop watering on a schedule and start checking on a schedule. The finger test, pot weight, and a look at the soil surface give you more reliable information than any calendar, and they take about ten seconds per plant.
Once you’ve got the basics — check before you water, drain fully, empty saucers, adjust for the season — most common houseplant problems become much easier to avoid. Healthy roots are stable roots, and stable roots give you a plant that’s far more forgiving of the occasional missed check or slightly off week.
FAQs
How do I know if my plant actually needs water?
Use three checks together: the finger test (is it dry about 2.5 cm down?), pot weight (does it feel noticeably lighter than usual?), and the soil surface (is it pale, cracked, or pulling away from the pot edge?). If two or three of those point to dry, water it. If they don’t agree, wait a day and check again.
Does leaving tap water out overnight make it safer for plants?
It can help reduce chlorine, which does off-gas over time. However, many municipal water supplies now use chloramine rather than chlorine — and chloramine does not evaporate if you leave water sitting out. If your plants are sensitive to tap water, the more reliable options are filtered water, distilled water, or collected rainwater.
Why are my plants turning yellow even though I water them regularly?
Yellowing lower leaves on a plant in constantly damp, heavy soil is the classic early sign of overwatering and oxygen-starved roots. The roots can’t take up water or nutrients properly, so the plant looks deficient even though the soil is wet. Pause watering, confirm the pot has a working drainage hole, let the soil dry out appropriately, and reassess whether the pot size is right for the plant.
Can I water all my houseplants on the same day?
You can check them all on the same day — but only water the ones that actually need it. A succulent on a sunny windowsill and a pothos in a corner will dry out at completely different rates. Grouping your check day is efficient; watering everything on the same day regardless of need is how problems start.
Should I mist my houseplants to water them?
Misting the foliage doesn’t water the roots in any meaningful way — the amount of moisture reaching the soil is negligible. Misting can help raise local humidity temporarily for sensitive plants, but it can also encourage fungal problems on leaves if the foliage stays damp for long periods. For actual watering, always water the soil directly, not the leaves.
My plant is wilting but the soil feels wet — what’s happening?
This is the classic overwatering warning sign. When roots sit in waterlogged soil, they lose access to oxygen and begin to break down — and damaged roots can’t move water upward to the leaves, so the plant wilts even though the pot is still heavy and damp. Don’t add more water. Let the soil dry out, check the roots if the plant doesn’t recover, and repot into fresh mix if the roots are mushy or smelling bad.
Sources and Further Reading
- UC Agriculture and Natural Resources – Watering Your Houseplants
- University of Maryland Extension – Watering Indoor Plants
- University of Maryland Extension – Symptoms of Overwatered Indoor Plants
- Colorado State University – Top Houseplant Watering Myths
- Clemson HGIC – Indoor Plants: Watering