A few years back, I had a peace lily that looked healthy until a busy couple of weeks threw off my watering routine. By the time I checked it properly, the leaves were drooping and the edges had started to crisp. A self-watering planter helped because it gave the plant a steadier supply of moisture instead of depending on me remembering the exact right day to water.
If your weeks are genuinely busy, forgetting to water isn’t a character flaw — it’s a system gap. A well-designed self-watering planter, also called a sub-irrigated or wicking planter, gives your plant a steady sip from a reservoir rather than a random flood from above. When the design is right and the potting mix is right, plants stay more stable — and stable is what keeps them alive long-term.
This guide covers how these planters actually work, what to look for before buying, a practical setup checklist, and how to fix the problems that catch most people off guard.
A few years back, I had a peace lily…
If your weeks are genuinely busy…
This guide covers how these planters actually work…
Quick Answer: Self-watering planters use a bottom reservoir and a wicking system to provide consistent moisture to plant roots through capillary action. To use them successfully, use a chunky, well-aerated potting mix, choose a planter with an overflow hole, and let the reservoir go dry for two to three days between refills to reduce the risk of root rot.
What Actually Matters in a Self-Watering Planter
A self-watering planter does not keep a plant healthy just because it has a reservoir. The most important details are the overflow hole, the wick or capillary insert, the potting mix, and whether the roots still get short dry phases. A planter with a good reservoir but dense soil can still cause root rot, while a simple design with airy mix and overflow protection can work very well.
For this guide, the recommendations focus on design features that matter in real homes: moisture consistency, root airflow, reservoir access, cleaning, overflow protection, and how easy the planter is to check during a busy week.
Best for: Busy indoor plant owners who forget watering days or travel for short periods
Time needed: 10–20 minutes to set up, then a quick weekly reservoir check
Main skills: Choosing the right planter, using airy soil, checking the reservoir, preventing root rot
Best method: Use a self-watering planter with overflow protection, then let the reservoir dry for 2–3 days before refilling
Important: A self-watering planter does not mean the plant should stay wet all the time. Dense soil, no overflow hole, or a reservoir kept constantly full can still cause root rot.
Table of contents
- Quick verdict: what actually keeps plants alive
- How self-watering planters actually work
- A common failure — and what it teaches
- What makes a self-watering planter reliable
- The most reliable styles by use case
- The setup that makes any planter work
- Common problems and fixes
- Buying checklist
- DIY self-watering: the cheap backup plan
- Final Thoughts on Self-Watering Planters
- FAQs
- Sources and further reading
Quick Verdict: What Actually Keeps Plants Alive on Busy Weeks
- Best for most people: a reservoir planter with an overflow hole, a reliable wick or capillary platform, and easy-to-clean reservoir access. The overflow hole matters more than most buyers realise — University of Maryland Extension notes that many well-designed self-watering containers use an overflow hole on the side to prevent the reservoir from flooding the root zone.
- Best plants to start with: herbs, leafy greens, pothos, peace lily, and philodendron — all plants that like consistent moisture and handle it well.
- Plants to be cautious with: most cacti and succulents, which prefer stronger dry periods. Constant reservoir moisture can cause root problems unless the mix is very airy and you intentionally allow dry phases.
- One habit that prevents most failures: top-water occasionally to flush fertilizer salts and refresh oxygen in the root zone. Even self-watering pots need this periodically.
How Self-Watering Planters Actually Work
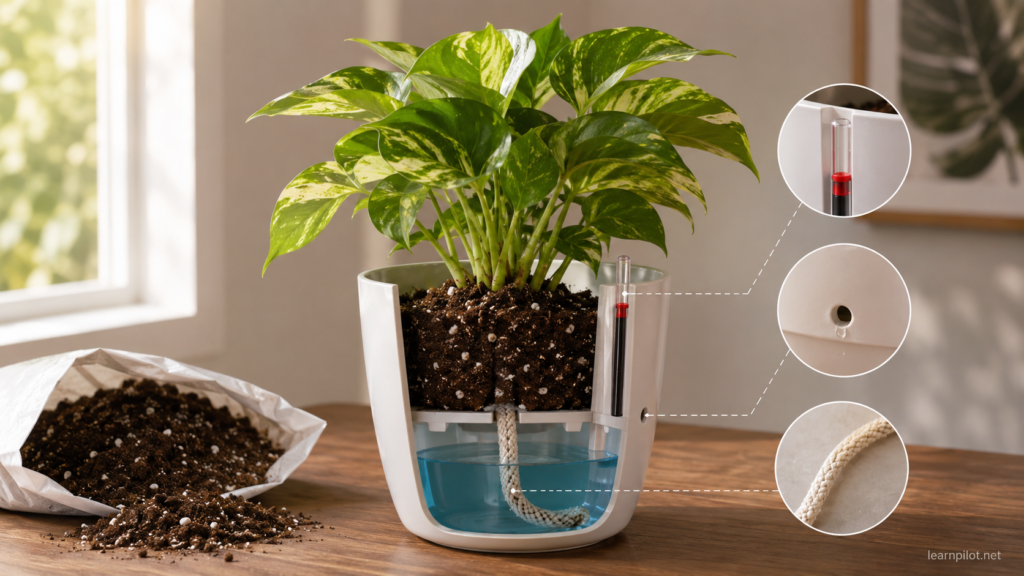
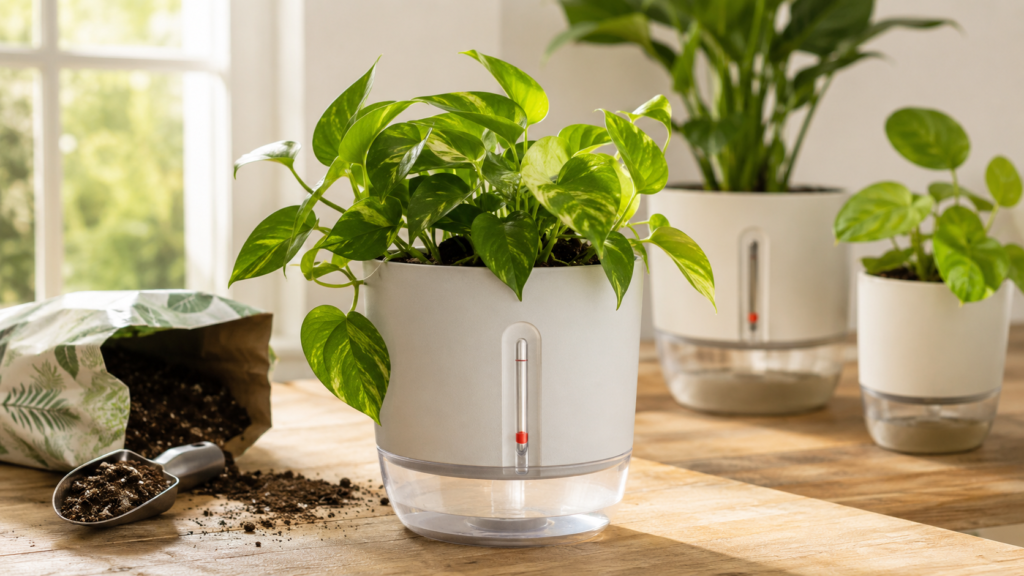
Most self-watering planters share the same basic principle: water sits in a lower reservoir, and the potting mix sits above it. Moisture moves upward through capillary action — water climbing slowly through the tiny spaces between soil particles — and often through a wick made of fabric, cord, or a spongy plug that keeps the connection between water and roots active.
Most quality designs also include a few important features beyond just the reservoir:
- Overflow protection: a hole or channel that prevents the reservoir from overfilling and keeping roots permanently submerged.
- A water level indicator: a float or visible window showing “min” and “max” so you know when to refill without guessing.
- A planned dry phase: some systems work better when you wait a day or two after the indicator hits “min” before refilling, giving roots a chance to breathe before the next moisture cycle begins.
Understanding these components makes setup much easier — and helps you spot cheap designs that skip the features that actually matter.
A Common Failure — and What It Teaches
One common failure with budget self-watering pots happens when the planter has a cotton wick and a water-level indicator, but the soil mix is too dense. The wick may pull moisture upward correctly, yet the heavy mix can stay wet for too long and leave roots without enough air.
At first, this kind of setup can look successful. The plant stays perky, the reservoir does the work, and watering feels easier. But after a few weeks, lower leaves may yellow, the soil may smell sour, or the plant may start looking tired even though the reservoir still shows water. The issue is not always the planter itself — often, it is the combination of dense soil and a reservoir that is kept full all the time.
The fix is straightforward: repot into a lighter, chunkier mix with added perlite, and wait two to three days after the indicator drops to “min” before refilling. Self-watering planters are not difficult, but they do need aerated soil and a dry phase built into the routine.
What Makes a Self-Watering Planter Actually Reliable
Rather than treating every planter as equal, it is more useful to judge them by how they fail in real homes. The best self-watering planter is not always the most expensive one. It is the one that gives roots moisture without removing air from the root zone.
Features that matter more than the brand name
- Overflow hole or overflow path: prevents the reservoir from flooding roots; this is non-negotiable on any design worth buying.
- Easy refill and clear indicator: if it is inconvenient to check or refill, you will not do it consistently — and then the whole system becomes less useful.
- Root aeration gap: a platform or air space between the reservoir and the potting mix helps prevent “swamp roots” by keeping some airflow around the lower root zone.
- Cleaning access: you need to be able to rinse the reservoir. Algae and mineral deposits build up over time, and a pot you cannot clean properly becomes a problem.
- Outdoor durability where relevant: UV resistance, frost resistance, and a drain screw or plug matter if the planter will live outside.
What is worth trusting for performance
- Extension service guidance on how wicking containers function and why soil structure matters.
- Clear manufacturer care instructions, especially around dry phases, initial setup, and outdoor drainage.
- Independent comparisons that explain how planters performed over time, not just how they looked out of the box.
The Most Reliable Styles by Use Case
The table below focuses on planter styles rather than pushing specific products. Availability changes, but the design features that matter stay mostly the same.
| Use case | What to look for | Example style |
|---|---|---|
| Indoor houseplants on a busy schedule | Water indicator, easy refill, cleaning access, stable base | A small indoor reservoir pot with a visible water indicator |
| Premium indoor or outdoor “set it and check it” use | Dry-phase guidance, visible indicator, UV and frost resistance, optional outdoor drain | A premium planter with an indicator and overflow system |
| Outdoor patios and balconies | Large reservoir, overflow protection, weatherproof materials | A weatherproof balcony reservoir planter |
| Large floor planters | Long refill intervals, sturdy build, easy-to-read indicator | A large floor planter with a visible water gauge |
| Raised beds with built-in reservoir | Reservoir capacity, drainage options, comfort height, weatherproofing | An elevated self-watering planter box |
If you want a safe place to start, choose a reservoir planter with an overflow hole and an indicator, and test it on a plant that genuinely likes consistent moisture — pothos, peace lily, or herbs. Skip the cactus for your first experiment.
The Setup That Makes Any Self-Watering Planter Work
Most “self-watering failed me” stories come from setup mistakes rather than a bad product: heavy soil, a wick that was not properly seated, a reservoir kept permanently full, or roots that never grew down to reach the moisture zone. Getting the setup right matters more than which specific model you choose.
Step 1: Use a light, airy potting mix
This is the single most important setup decision. Wicking systems move moisture through the tiny spaces between soil particles. A compacted, dense mix either stays waterlogged or blocks moisture movement entirely. Use a potting mix that stays loose and well-structured; many indoor plant owners add perlite to improve airflow and drainage. Extension guidance on wicking containers emphasises that capillary action depends on soil particle size and structure, not just the reservoir design.
Step 2: Top-water first, even in a self-watering pot
After potting up, water from the top to fully saturate the mix and establish the wicking path. The reservoir alone will not always do this reliably at first — the moisture needs to reach the wick before the capillary system works properly. Many self-watering setups need a short settling-in period before you rely mostly on the reservoir.
Step 3: Build in a dry phase
Keeping the reservoir permanently full is the most common cause of root problems in self-watering pots. A better rhythm is to fill to “max,” let it drop to “min,” and then wait two to three days before refilling. This gives roots a brief breathing period. Plants that like consistency, such as pothos and peace lily, usually tolerate this easily. Plants that like to dry out more, such as snake plants and many succulents, may need longer dry phases or a different pot entirely.
Step 4: Do a 7-day calibration in your specific home
This is the most practically useful step most guides skip. Fill the reservoir, mark the level or note where the indicator sits, and then check it again after seven days without refilling. That one check tells you how fast your home, your light conditions, and your specific plant use water. Once you know that rate, deciding when to refill becomes simple rather than guesswork.
Common Problems and Fixes
Algae growing in the reservoir
Algae needs light and water to grow — and a transparent reservoir near a bright window gives it both. The fix is straightforward: block the light and clean the reservoir regularly. Opaque pots help significantly, and so does keeping the planter out of direct sun. Every few weeks, empty the reservoir completely and rinse it out, wiping away any slime film before refilling. Avoid pouring random cleaning products into the reservoir; plain water and a rinse are enough for routine maintenance.
Root rot or a sour smell from the pot
Root rot usually means the root zone stayed wet for too long. Three things to check: first, confirm there is an overflow path. Many self-watering designs rely on an overflow hole to prevent the reservoir from flooding upward into the soil. Second, introduce a proper dry phase rather than keeping the reservoir permanently topped up. Third, if the mix is dense, repot into something chunkier with better air exchange. Roots need oxygen as well as moisture, and a swampy mix denies them both.
Leaves yellowing even though the reservoir shows water
Two common causes are constant wetness stressing the roots, or salt buildup from fertilizer that has never been flushed out. Self-watering pots do not automatically flush the soil the way thorough top-watering does. If you fertilize regularly or use hard tap water, mineral salts can accumulate in the mix over time and damage roots even when moisture looks correct. University of Maryland Extension recommends periodic leaching — top-watering generously until water drains freely — to remove excess soluble salts. Doing this once every four to six weeks prevents most salt-related problems.
Buying Checklist: How to Choose the Right Planter
Before you buy, answer these three questions first. They quickly narrow down what you actually need:
- How thirsty is the plant? Herbs and peace lilies drink faster and more consistently than snake plants or ZZ plants. Match the reservoir size to the plant’s actual needs.
- How long do you need it to last unattended? A weekend away, a 10-day work trip, or “I just tend to forget” are three very different reservoir requirements.
- Where will the planter live? A hot, windy balcony drains a reservoir far faster than a cool, dim office corner. Your environment changes refill frequency significantly.
Then check the pot itself against this list:
- Overflow protection — non-negotiable; skip any design that lacks it.
- Reservoir access you will realistically clean — if it requires disassembly, you probably will not do it often enough.
- An indicator you can read at a glance — a float, a tube, or a transparent window; anything that requires you to guess defeats the purpose.
- For outdoor use: UV-stable materials, frost resistance where relevant, and a drain option for heavy rainfall seasons.
DIY Self-Watering: The Cheap Backup Plan
If you are not ready to buy anything yet, a DIY wicking setup can work surprisingly well for herbs and many common houseplants — and it costs almost nothing to try. The basic idea is the same as a commercial planter: a container with potting mix, a reservoir below or alongside it, and a wick made from cotton cord, fabric strips, or a sponge to move moisture upward.
Inverted plastic bottles with a wick pushed through the cap are a popular version: fill the bottle with water, invert it into the soil, and the mix draws water out slowly as it dries. It will not last as long as a proper reservoir pot, but for a short absence it can be enough. The same principles apply as with any wicking system: use airy, loose soil, and do not let the water source sit in direct sun or it may go stagnant.
Final Thoughts on Self-Watering Planters
Self-watering planters genuinely work, but they work because of the system, not because they remove plant care completely. The reservoir keeps moisture available; the wick moves it to where roots need it; the overflow hole prevents flooding; and the potting mix determines whether roots get both moisture and air. Get those four things right and many plants will do better in a self-watering setup than they would on an irregular hand-watering schedule.
The one habit worth building on top of all of it is occasional top-watering. Flush the mix, let salts wash through, and reset the root zone. It takes only a few minutes every few weeks and prevents many of the problems that make people give up on self-watering pots entirely.
FAQs
Do self-watering planters actually work?
Yes, when the design includes overflow protection, the soil mix is airy enough to support wicking, and you allow a dry phase rather than keeping the reservoir permanently full. Failures usually come from setup mistakes — especially dense soil, no overflow protection, or refilling the reservoir too often — rather than from a fundamental problem with the concept.
How often do you need to refill the reservoir?
It varies depending on the plant’s thirst, the reservoir size, the season, and where the planter sits. A peace lily in a sunny kitchen window will drain a reservoir faster than a pothos in a cool corner. The most useful thing you can do is run the 7-day calibration described in the setup section: fill once, check after a week, and you will know your specific refill rate without guessing.
Can you still overwater a plant in a self-watering planter?
Yes. If the reservoir stays constantly full, the potting mix is dense and poorly aerated, or the plant prefers stronger dry periods between waterings, the root zone can stay oxygen-starved for too long. Using a chunky, well-aerated mix and building in a dry phase after the indicator hits “min” removes most of that risk.
Do I still need to water from the top sometimes?
Yes. At initial setup, top-watering fully saturates the mix and establishes the wicking path before the reservoir takes over. Periodic top-watering also flushes accumulated fertilizer salts and mineral deposits from the mix. If you only ever use the reservoir, salts can build up over time and damage roots even when moisture looks correct.
Are self-watering planters good for succulents and cacti?
They can work, but they require more careful management than moisture-loving plants. Most succulents and cacti prefer pronounced dry periods between waterings, which goes against the steady-moisture principle of most reservoir planters. If you want to try it, use a very gritty, fast-draining mix and allow much longer dry phases. For beginners, starting with pothos, peace lily, herbs, or philodendron is easier.
How do I stop algae from growing in the reservoir?
Algae needs light and water, so the fix is to reduce light reaching the reservoir. Opaque pots help significantly. Keep the planter out of direct sun if possible, empty and rinse the reservoir every few weeks, and wipe away any slime before refilling. You do not need chemical treatment for routine maintenance — plain water and a clean cloth are enough.
Sources and Further Reading
- University of Maryland Extension – Self-Watering Containers
- University of Kentucky – Wicking Containers (PDF)
- UF/IFAS Extension – Self-Watering Container Gardens
- University of Maryland Extension – Watering Indoor Plants
- Better Homes & Gardens – Best Self-Watering Planters